
The hair salon has been the home for women and men making drastic changes to their hair. Whether it’s bleaching it, cutting it all off, perming it, or even braiding it, the salon has been the safest space for people to do their hair. Hairstylists are professionals, so they make you feel more secure and confident in making alterations to your hair.
But then there’s the flip side of going to the salon, the price. Salons are known to be expensive when you’re interested in a service that will take a lot of time and labor, like balayage highlights or a Brazilian Blowout. These types of services require a high skill level, which is why they are usually priced high.
If you’re someone who is looking to dye or cut your hair without the high price tag, there are a few important things to keep in mind in order to safely achieve the style you desire.
HOW TO PROPERLY DYE YOUR HAIR AT HOME
With the huge array of hair color products, shade options, and techniques available, it's hard to know how to get it right when it comes to dyeing your hair at home. Before you actually dye your hair, there are a few things that you should keep in mind.
Save major color changes for the salon
If you are looking to go from brown to auburn, or light blonde to a warmer blonde, keep reading our DIY tips. If you are tempted to transition from black to platinum blonde hair, think again. Celebrity hairstylist Kari Hill says, “[w]hen dyeing your hair yourself, stay within two shades, lighter or darker, of your current color.”
Drastic color changes from one color family to another can and will require multiple salon visits. Professional hairstylists and colorists know how to assess colors and minimize hair damage. They use high-quality hair coloring products, which is why services can be expensive.
Chemically processing your hair and dyeing your hair is a no-go
Do not dye your hair if it has been relaxed or permed. Chemical processes such as these already cause damage to your natural hair. It is advised to only dye natural hair, but if you must do both processes, wait at least a few weeks before dyeing your hair.
Relaxing, perming, or bleaching your hair can cause your hair to become brittle and dry. Be conscious about the moisture that your hair will need after that process.

Buy more than one box of dye
One of the worst things that can happen is that halfway through dyeing your hair, discovering you’ve run out of dye. Always have two boxes handy just in case. No one wants to make a Walgreens run with a shower cap full of dye.
Always perform a strand test
Test the dye on a few strands of hair or hair that’s been cut off to see how your hair will take to the dye. No one wants to dye their whole head blonde, only to end up with orange hair.
Prep your hairline with vaseline
No one wants to stay inside after a beautiful dye job because the dye wouldn’t come off of their forehead. Rather than rub your skin red trying to get rid of the dye, prep your skin with a salve like vaseline before you dye it. Make sure to get across your forehead and around your ears.
After you're done with your dye job, use a cleansing wipe to clean any areas you may have missed.
Do not custom mix box dye
Combining different shades of box dye is a no-no when dyeing your hair at home. There is no guarantee that the color you envision will be the color you will get. If you are adamant about creating a custom dye color, book a salon visit and allow a professional colorist to assist you.
Work your way down
Begin applying the hair dye at the roots of your hair, since they will need the most color and processing time. Then, comb the dye through the rest of your hair to evenly distribute it. It’s helpful to divide your hair into four to six sections, securing each with a hair clip.
Easy way to do highlights
If you’re interested in highlights, you can achieve them at home with a toothbrush. It will allow you to paint on the dye more effectively. Place them where the sun would hit your hair.
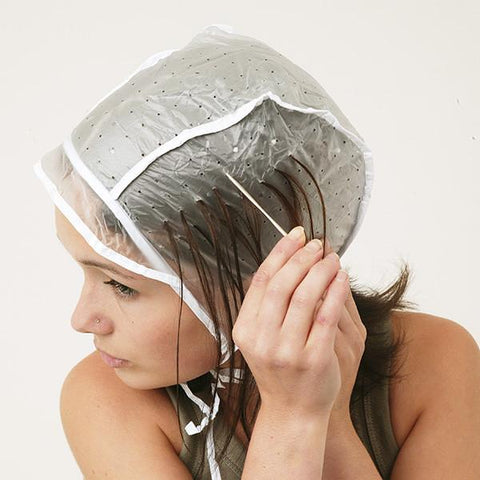
If a toothbrush seems intimidating you can use a plastic highlighting cap. This is especially useful if you are highlighting your hair by yourself. The cap has holes that you can pull strands of hair through to easily apply the dye. Check out this how-to video we found on YouTube.
Seal with a shower cap
Once you’ve completed your dyeing job, cover your hair with a disposable shower cap. This will prevent drippage and allow you to get a few things done around the house while the dye processes.
Shampoos designed for color-treated hair will be your best friend
To be honest, no shampoo is completely color-safe. Switch your old shampoo for one that has the phrase “color protect” or “for color-treated hair.” Using hair products that are designed for colored hair will help to preserve your dye job and extend the life of your new color.
HOW TO CUT YOUR HAIR AT HOME
As we mentioned before, drastic hair cuts should be left to salon professionals, unless you are a professional yourself. There are a lot of things that can go wrong when you decide to cut your hair at home.
But if you need a quick bang trim or you can’t stand your split ends, follow these simple tips to successfully cut your hair in the comfort of your own bathroom.
Do not use kitchen scissors

Kitchen scissors can potentially give you even more split ends. Never use them to cut your hair! Stick with a trusty pair of styling shears. Take your time when you’re trimming or cutting your hair. You can always cut off more hair, but you can’t reattach what you’ve cut.
If you have curly or coily hair...
It’s best for those with thick, curly hair, to section your layers and make minor cuts to your ends for healthier hair in between professional trips to the salon. If you’re familiar with two-strand twists, trim any dead ends of each twist. This technique is called “dusting.”
It’s a micro-trim that will ensure you’re not cutting too much hair and will allow you to only trim a little at a time.
Long layers for straight hair
For this one, you’ll put your hair in a ponytail, centered in the middle of the top of your head. Make sure the ponytail is smooth and tight.
Looking in a mirror, hold the ponytail straight up, and cut across the ends. Let your hair down and check out your blended, even, pretty long layers.
DIY CAN BE RISKY
Performing any salon service in your house is cheaper, but also can be tricky. If you are not a professional, do as much research as possible, whether it’s speaking with a hairstylist or watching 20 Youtube videos. Preparation, focus, and following instructions is a recipe for DIY success.
There are many other hair services you can perform on yourself outside of dyeing and cutting it. But the steps you should take are relatively the same. Whether you have short or long hair, natural or color-treated hair, the RevAir Reverse-Air Dryer should be in your DIY arsenal.